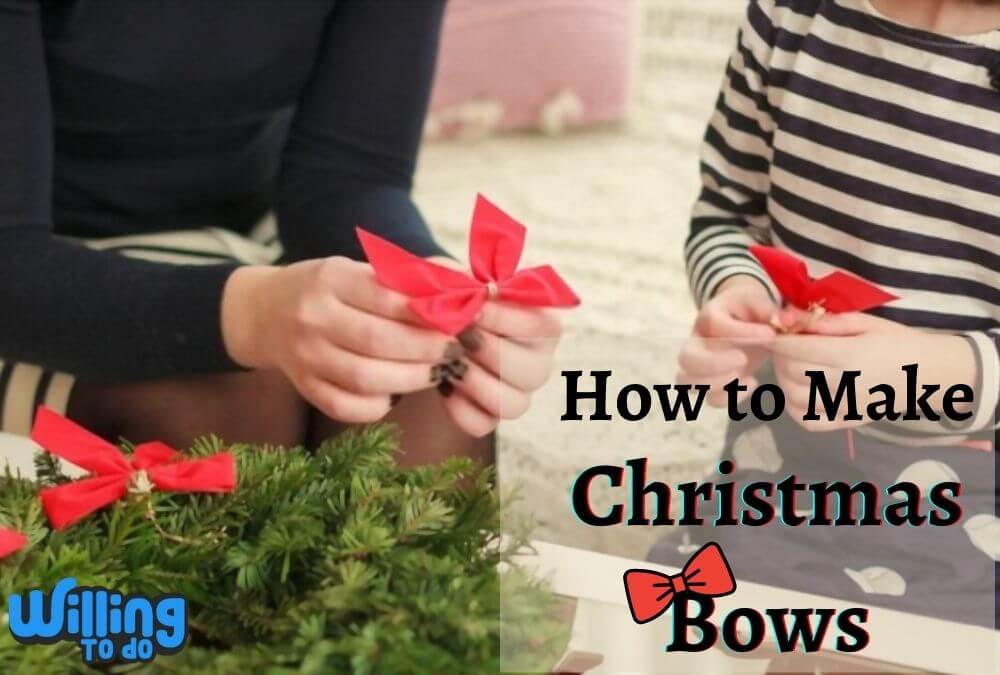
However, a gift is not just about what is inside the box; it is about the love and effort put into the presentation. One of the most common questions people ask during the holidays is how to make Christmas bows that look professional yet personal.
Decorating for this festive season makes the occasion feel even more special. While the Christmas tree is the centerpiece, the small details like stars, beads, and especially bows truly bring the holiday spirit to life.
A handmade bow adds a touch of elegance that store-bought plastic versions simply cannot match. If you want to elevate your gift-wrapping game this year, you are in the right place.
In this guide, we will explore ten fantastic ways to create stunning bows that will make your presents stand out under the tree.
Why Learning How to Make Christmas Bows is a Holiday Essential
There is something incredibly satisfying about crafting your own holiday decor. When you know how to make Christmas bows, you gain the freedom to customize your gifts to match any theme or color palette.
Instead of rushing to a craft store to buy expensive, pre-made bows that often get crushed in the bag, you can use high-quality ribbons to create something lasting and beautiful.
Handmade bows are not just for presents either. Once you master these techniques, you can use them to adorn your White Christmas Tree, decorate your staircase, or add a festive touch to a homemade wreath.
Whether you prefer a traditional look or something more modern and whimsical, these DIY hacks will turn your Christmas evening into something truly adorable.
1. How to Make a Classic Bow
The classic bow is the foundation of gift wrapping. It is elegant, timeless, and surprisingly easy to put together once you understand the rhythm of the loops. For this style, it is often best to use a wired ribbon.
The wire allows the bow to hold its shape and gives it a full, luxurious look that lasts all season long. If you have ever been curious about how to make Christmas bows that look like they came from a high-end boutique, this is the perfect place to start.

Follow these simple directions:
- Choose a ribbon and decide how long you want the tails to be.
- Create three loops with the ribbon.
- Loop the ribbon in an upward, downward, and upward motion again.
- Cross the right loop over the left one so that the side loop with the tail hangs down naturally.
- Fold the right loop down through the center loop and pull firmly.
- Arrange and fluff the loops until the bow looks symmetrical.
These classic bows bring a traditional touch to your holiday celebrations. Once you learn this basic skill, the mystery of how to make Christmas bows becomes much clearer. You can experiment with different textures like satin or burlap to change the vibe of the gift.
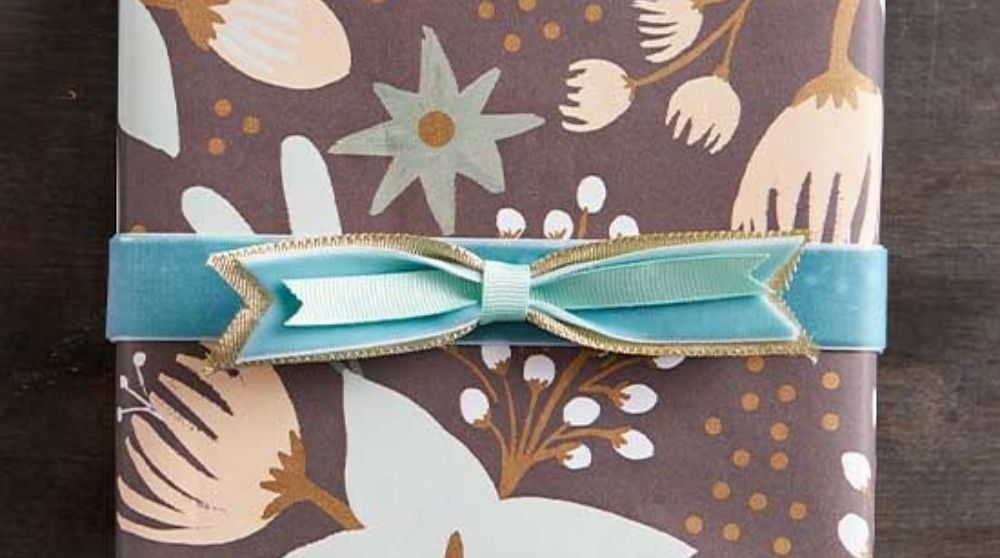
2. How to Make a Layered Bow
If you want your presents to have a bit more depth and texture, the layered bow is a fantastic choice. Using bright colors can enhance the enchanting feel of Christmas night.
A layered bow looks sophisticated because it uses multiple pieces of ribbon to create a structured, “stacked” effect. This is a great way to use up shorter scraps of ribbon you might have lying around. It ensures your gifts look amazing sitting under the tree.

Follow these directions:
- Choose a velvet or grosgrain fabric for a premium feel.
- Cut the ribbon to at least 2 inches in width.
- Prepare several pieces in varying lengths, such as 3, 5, 7, and 9 inches.
- Lay the ribbons face down on a flat surface.
- Apply a piece of double-stick tape to the center of each ribbon strip.
- Fold the edges of each ribbon toward the center and press down to adhere to the tape.
- This process creates two distinct loops for each piece.
- Tape the ends of the small center loop together to hide the seam.
- Cut a bottom layer piece that is slightly longer than your largest loop and notch the ends for a finished look.
- Stack all the loops on top of each other in ascending order (largest on bottom, smallest on top).
- Secure the center of the stack with double-stick tape as you go.
- Wrap a long ribbon through the very top center loop.
- Secure it around the package by taping it at the back.
This festive design provides an eye-catchy look that makes your presents feel unique. It is a reliable method when you are focusing on how to make Christmas bows that look high-end without the high-end price tag.
3. How to Make a Double Bow
The double bow is all about volume. It adds a lovely twist to your gift presentation and makes the wrapping look much more intentional. This style is perfect for smaller gifts or gift bags where you want the bow to be the main attraction.
You can use two different colors for a vibrant look or stay with one color for a more subtle, textured appearance. Learning how to make Christmas bows like this will definitely impress your friends and family.
Follow these directions:
- Rotate your index and middle fingers sideways to create a gap.
- Loop the ribbon around these two fingers twice.
- Bring the tail of the ribbon to the front of your middle finger.
- Loop it back around your middle finger.
- Place the tail horizontally across the vertical loops of the ribbon.
- Thread the ribbon through the space between your index and middle fingers.
- Circle back around and cross over so the horizontal ribbon creates an “X” shape.
- Pull the ribbon up and behind the “X.”
- Tighten the center knot securely.
- Arrange and fluff the loops for a perfect finish.
This method is quick and produces a very professional result. It is one of the most efficient ways to solve the problem of how to make Christmas bows when you have a lot of presents to wrap in one sitting.
4. How to Make a Rosette Bow
A decorative rosette bow can transform an ordinary box into a genuine work of art. These are the large, fluffy bows you often see on premium gift baskets or holiday wreaths. While they look complicated, they are actually quite simple to construct.
If you are serious about mastering how to make Christmas bows, the rosette is a must-learn technique. Your expert bow-making skills will surely leave an impression on everyone who sees your handiwork.
Follow these directions:
- Choose your preferred ribbon color and size.
- Wrap the ribbon around the palm of your hand 8 to 10 times.
- The width of the ribbon will determine how full the final bow appears.
- Flatten the wrapped ribbon and cut small notches into the center of the sides (be careful not to cut all the way through).
- Hold all the loops together at the notched center.
- Use a small piece of wire or a thin ribbon to tie around the notches.
- Twist the wire as tightly as possible to secure all the loops.
- Trim the excess wire and begin pulling the loops out from the center one by one.
- Twist and fluff each loop as you pull it to create the rosette shape.
Within just a few minutes, you can have a collection of beautiful, voluminous bows. This hack is perfect for anyone wanting to know how to make Christmas bows for large packages or home decor.
5. How to Make a Florist Bow
Whether you are preparing a bouquet of fresh flowers or a large handmade gift, the florist bow is the gold standard. It is thick, fluffy, and adds immense charm to any presentation. For the best results, use a ribbon with wired edges, as this helps the many loops maintain their shape.
If you have been looking for how to make Christmas bows that have that professional “florist” touch, follow these steps carefully.
Follow these directions:
- Select a thick ribbon or one with wired edges for better structure.
- Determine your desired tail length and twist the ribbon so the “right” side is facing you.
- This creates the center starting point of your bow.
- Create a loop and twist it at the center, holding it between your thumb and index finger.
- Make another loop of the same size on the opposite side.
- Twist the loop toward you and pinch the ribbon tightly at the center pivot point.
- Continue making same-size loops on alternating sides to build fullness.
- Once you reach your desired size, wrap a narrow piece of ribbon around the center to secure it.
- Tie the tails together at the back.
- Leave the tails untrimmed if you plan to wrap them around a bouquet or a wreath.
- Arrange the loops into a circular, full shape.
The stunning floral appearance of this bow will instantly elevate your holiday gifts. Understanding how to make Christmas bows like this makes the season feel much more festive and polished.
6. How to Make a Two-Toned Bow
To make your presents look even more attractive, you can try a two-toned bow. By incorporating two different colors or patterns, you create a dual texture that looks fantastic on wreaths and holiday packages.
This is a very creative approach to how to make Christmas bows and allows you to play with contrasting holiday colors like red and gold or blue and silver.

Follow these directions:
- Pick two ribbons of the same length but different widths.
- Cut both ribbons to your desired length (4 inches is usually a great starting point for a standard gift).
- Twist the wider ribbon into a loop and secure the ends with a dab of glue.
- Center the narrower ribbon on top of the wider one and wrap it around, securing it as well.
- Flatten the layered loop in the center to create a bow shape.
- Wrap a third, smaller piece of ribbon around the center to hide the seams.
- You can leave the ends of this center ribbon long to act as tails.
- Pull the tails tight and secure them at the back with glue.
- Trim the ends neatly for a finished appearance.
When your two-toned bow is finished, it is ready to be the star of your gift package. If you are still exploring how to make Christmas bows, this method offers a modern look that stands out from the crowd.
7. How to Make a Three-Tiered Bow
One of the easiest ways to add a delicate, handmade touch to your Christmas gifts is by using a three-tiered bow. This style looks very intricate but is actually quite simple to assemble.
It involves stacking three different ribbons of varying widths on top of each other. This is a great way to show off your creativity and solve the riddle of how to make Christmas bows that look incredibly detailed.
Follow these directions:
- Select three different styles and widths of ribbon.
- Cut the widest ribbon to the longest length, and the others in descending sizes.
- Notch the ends of each ribbon for a professional look and stack them on top of each other.
- Apply a small amount of glue to keep the layers centered.
- Tie the stacked ribbons in the center with a fourth piece of ribbon, leaving the tails long.
- Trim and conceal the center ribbon’s tails or use them to tie the bow directly to the package.
This tiered approach adds a sophisticated touch to any gift under the tree. Your guests might even ask you to teach them how to make Christmas bows after they see how beautiful your presents look.
8. How to Make Pretty Paper Bows
You do not always need ribbon to create a beautiful topper. Paper bows are a fantastic, modern alternative that can be made from wrapping paper, cardstock, or even craft felt. If you are looking for a unique take on how to make Christmas bows, paper crafts are the way to go.
They are sturdy, colorful, and very easy to customize with different patterns. You might even want to learn how to make paper look old to give your paper bows a vintage, rustic feel.

Follow these directions:
- Trace a bow shape onto double-sided patterned paper.
- Carefully cut out the pattern.
- Apply a small dab of hot glue to the center of the rounded shape.
- Fold each end into the middle and press firmly until the glue sets.
- Glue the larger shapes together to form the body of the bow.
- Fold a small rectangular piece of paper over the center to hide the connection point.
- Secure everything with glue.
- Add a foam adhesive dot to the back to easily attach the bow to your gift.
Skip the traditional ribbon this year and try these adorable paper versions. They are a fun way to experiment with how to make Christmas bows while using materials you likely already have at home.
9. How to Make a Felt Gift Topper
If you want to add a bit of “fuzz” and fun to your Christmas presents, felt mums are a wonderful option. Don’t be intimidated by the name; these are very simple to make and add a cozy, personalized touch to your gifts.
They can be made in any color to match your holiday theme. When people ask you how to make Christmas bows, you can show them this unique fabric alternative.
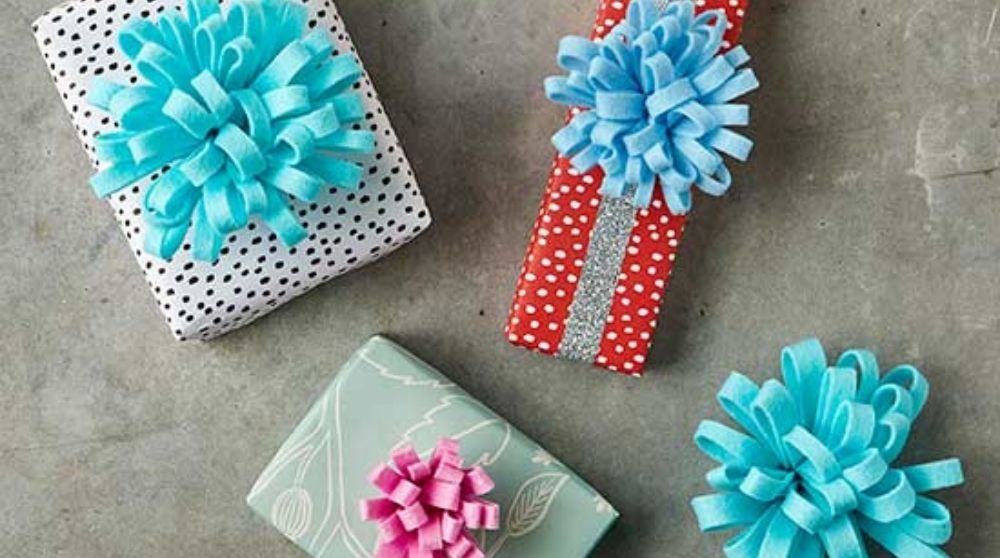
Follow these directions:
- Cut 8 by 10 inch pieces of felt that match your holiday theme.
- Each strip should be wide enough to fold in half lengthwise.
- Hand-stitch along the open edge of the folded strip to keep it together.
- Cut small slits about a quarter inch apart along the folded edge (do not cut through the stitching).
- Roll the strip into a tight coil.
- Secure the coil with a few stitches at the base.
- To finish, glue a small circle of felt to the bottom to hide the coil and make it look polished.
While this might seem slightly more involved, the result is a beautiful, durable gift topper that can even be reused. It is a fantastic answer to the question of how to make Christmas bows with a bit of a twist.
10. How to Make a Pom-Pom Bow
The pom-pom bow is all about volume and playfulness. It works best with shimmery or silk ribbons and adds a lot of grace to plain gift wrapping.
There is no complicated science involved in how to make Christmas bows in this style; it just takes a little bit of patience and some clever cutting. It is one of the most sophisticated styles you can master.

Follow these directions:
- Create a circle of ribbon that is the desired width of your bow.
- Loop the ribbon around about eight times.
- Flatten the loops and make small diagonal cuts at all four corners of the flattened ribbon.
- Refold the loops so the notches you just cut are aligned in the center.
- Tie a thin piece of ribbon or wire tightly around the notched center.
- Starting on one side, pull out the innermost loop and twist it to the right.
- Pull out the next loop and twist it to the left.
- Continue this process until all loops are pulled out and twisted.
- Repeat the steps for the other side of the bow.
- Fluff and adjust the loops until it looks like a full pom-pom.
This bow adds a high level of sophistication to your presents. If you have been worried about how to make Christmas bows that look truly professional, the pom-pom style is a guaranteed winner.
Expert Tips for Perfect Christmas Bows
To ensure your bows look their best, consider these expert tips. First, always use sharp scissors; dull blades can fray the edges of your ribbon and make your hard work look messy. Second, don’t be afraid to use wire.
Florist wire is your best friend when learning how to make Christmas bows because it provides the structural integrity that ribbon alone sometimes lacks.
Finally, think about the scale. A tiny bow on a massive box can look lost, while a massive bow on a small jewelry box might be overwhelming. Matching the size of your bow to the size of the gift is a key part of the process.
If you find yourself needing to organize your digital life before the holiday rush, you might also want to check out our guide on how to delete a Discord server to clear out some of that online clutter.
Frequently Asked Questions (FAQ)
What is the best type of ribbon for making Christmas bows?
Wired ribbon is generally considered the best choice for beginners and pros alike. The thin wire along the edges allows you to mold the loops and ensures the bow doesn’t go flat. Satin and grosgrain are also popular for a softer, more classic look.
How much ribbon do I need for a standard Christmas bow?
For a standard 5 to 6 inch bow, you will typically need about 2 to 3 yards of ribbon. If you are making a more complex bow like a rosette or a florist bow, you may need 4 to 5 yards to achieve the desired fullness.
Can I reuse Christmas bows from year to year?
Absolutely! If you use high-quality wired ribbon, you can easily fluff the loops back into shape the following year. Store them in a hard-sided container rather than a bag to prevent them from being crushed.
Do I need a hot glue gun to make these bows?
While not strictly necessary for every style, a hot glue gun is very helpful for layered bows, paper bows, and felt toppers. It provides a quick, strong bond that holds up better than standard tape or school glue.
How can I attach the bow to the gift without it falling off?
Using the tails of the ribbon to tie around the package is the most secure method. For pre-made or paper bows, double-sided foam tape or a small dab of hot glue works best to keep the bow centered on the gift.
Conclusion
Religious and seasonal events only come once a year, so it is worth putting in the extra effort to make them memorable. Learning how to make Christmas bows is a skill that will serve you for many holidays to come.
From the classic wired loop to the modern paper bow, these ten hacks offer something for every style and skill level. This year, leave no stone unturned in your quest for the perfect holiday decor.
Your friends and family will surely appreciate the extra touch of love and creativity you put into their presents. Happy crafting and Merry Christmas!