
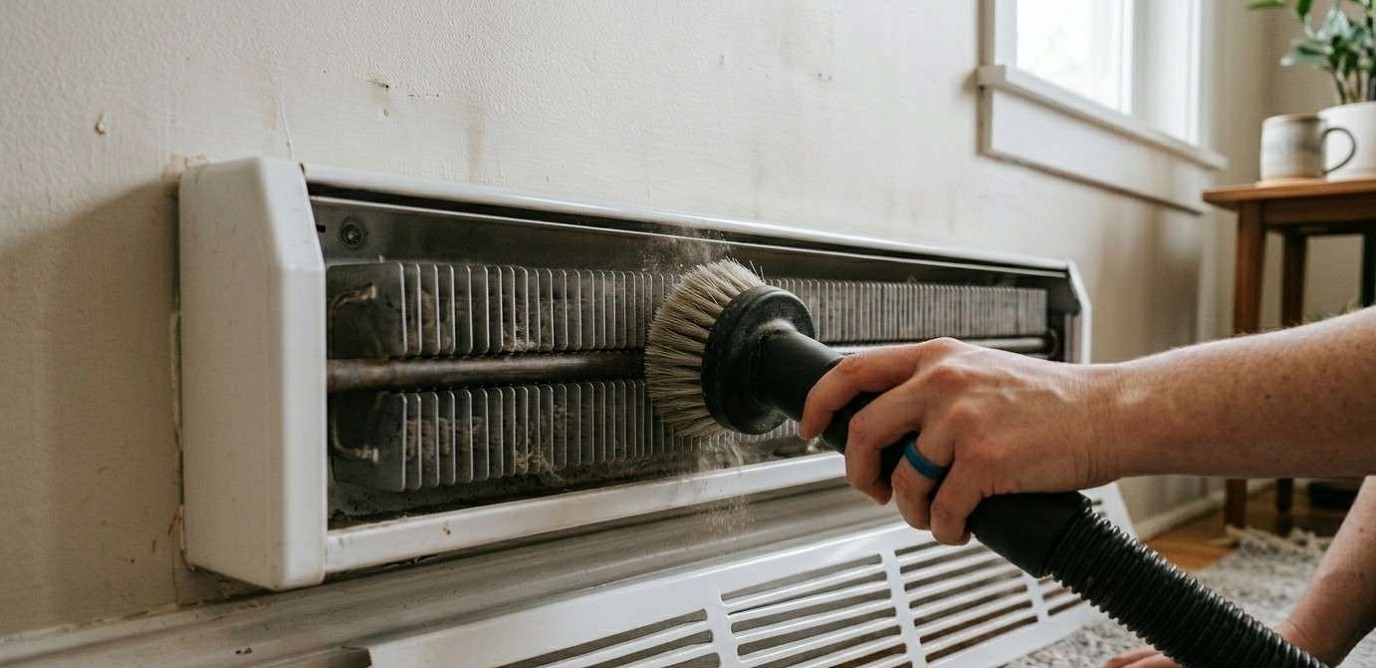
To clean electric baseboard heaters effectively, you should first turn off the power at your breaker box to ensure total safety. Once the unit is cool, remove the front cover and use a vacuum with a soft brush attachment to gently lift away dust and pet hair from the internal aluminum fins.
For any remaining grime, a lightly dampened microfiber cloth with a drop of mild dish soap works wonders, provided you let everything dry completely before restoring power. Keeping these heaters clear of debris not only stops that common “burnt dust” smell but also helps your heating system run much more efficiently, which keeps your home warmer and your energy bills lower.
Learning how to clean electric baseboard heaters is one of the best things you can do for your home comfort. Dust acts like a blanket that traps heat inside the unit. This makes your heater work much harder than it needs to. When you remove that dirt, you breathe cleaner air and save money on your power bill. At Willing to do, we believe that taking care of your home should be simple and stress-free.
What is the best way to clean electric baseboard heaters?
To clean electric baseboard heaters effectively, you must first turn off the power at the breaker box for safety. Use a vacuum with a brush attachment to remove loose dust from the fins and the floor underneath. For stubborn grime, a soft microfiber cloth dampened with water and mild soap works best. Avoid using excess water or harsh chemicals that could damage the heating elements or cause odors when the unit heats up.
Why Cleaning Your Heaters Actually Matters
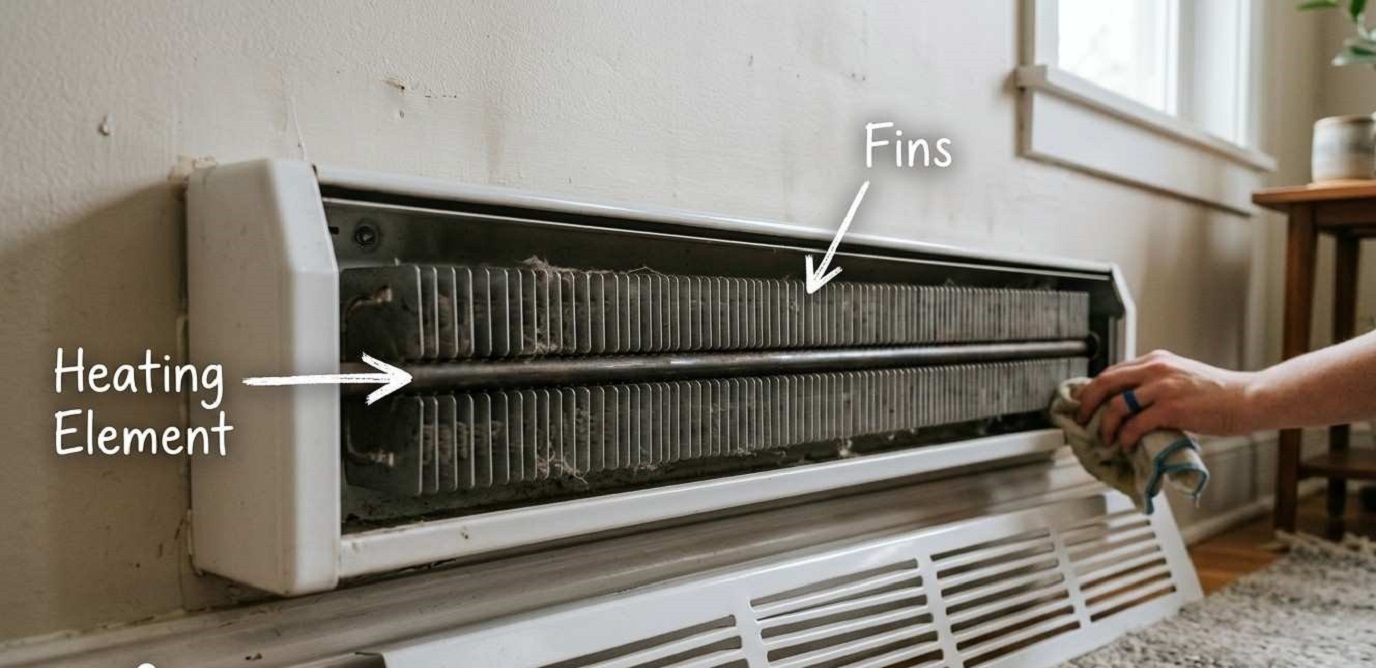
Electric baseboard heaters are simple machines, but they are very sensitive to dirt. Think of the metal fins inside the heater like lungs. They need to “breathe” to move warm air into your room. When dust, pet hair, or lint fills the gaps between those fins, the air cannot move.
This creates several problems that affect your daily life. First, there is the smell. That “burnt toast” aroma is actually dust literally cooking on the heating element. Second, there is the cost. A dirty heater stays on longer to reach the temperature you set on the thermostat. This wastes electricity every single minute it runs. Most importantly, a clogged heater is a fire hazard. Keeping them clean is the easiest way to keep your family safe during the cold months.
Understanding Your Electric Baseboard Heater
Before we pick up a cloth, let us look at what is actually inside that metal box. Understanding the parts makes the job much less intimidating.
| Component | Purpose | Cleaning Priority |
| Front Cover | Protects the internal parts and directs air. | High (Dust collects here first) |
| Heating Element | The rod that gets hot when electricity flows. | Medium (Very delicate) |
| Aluminum Fins | Thin plates that spread heat into the air. | High (Most dust hides here) |
| Thermostat | Tells the heater when to turn on or off. | Low (Just wipe the exterior) |
How do these heaters work?
Electric baseboard heaters use a process called “convection.” Cold air sits near the floor. It enters the bottom of the heater, gets warmed up by the hot fins, and then rises naturally into the room. If the path is blocked by dust, the cycle stops. This is why cleaning is not just about looks. It is about physics.
Tools You Will Need
You do not need expensive machines to get this done. Most of these items are already in your cleaning closet.
-
A Vacuum: A model with a hose and a soft brush tool is perfect.
-
Microfiber Cloths: These grab dust instead of just pushing it around.
-
Mild Dish Soap: To cut through kitchen grease if the heater is near a stove.
-
A Screwdriver: Some covers are held on by small screws.
-
Soft Paintbrush: Great for reaching deep between the metal fins.
Step by Step: How to Clean Electric Baseboard Heaters
Follow these steps carefully. If you feel overwhelmed, just take it one heater at a time. You do not have to finish the whole house in 10 minutes.
Step 1: Safety First (The Most Important Part)
Never clean a heater while it is plugged in or receiving power. Go to your electrical panel (the breaker box) and flip the switch for the heaters to the “OFF” position. This ensures no electricity is flowing. Give the heaters at least 30 minutes to cool down completely. Touching a hot element can cause painful burns.
Step 2: Remove the Front Cover
Most covers either snap off or are held by a few screws at the ends. Gently lift the cover away from the wall. If it feels stuck, do not pull too hard. Check for hidden clips. Once it is off, take it to a different room or outside to wipe it down. This prevents the dust on the cover from falling back into the heater.
Step 3: Vacuum the Fins
This is where the magic happens. Use your vacuum brush to go over the aluminum fins. Move the brush vertically (up and down) rather than horizontally. The fins are very thin and can bend easily. If you bend them, the air cannot flow through the gaps.
Step 4: Use the Paintbrush for Deep Dust
Sometimes the vacuum cannot reach the very back. A dry, clean paintbrush is your best friend here. Gently wiggle the bristles between the fins to knock loose any stubborn clumps of pet hair or lint. Vacuum the floor immediately after to catch what falls out.
Step 5: Wipe the Interior Housing
Take a slightly damp microfiber cloth. Do not make it dripping wet. Wipe the metal backplate and the bottom of the unit. This removes the “sticky” dust that the vacuum missed. Avoid touching the heating element rod directly with a wet cloth if possible.
Step 6: Clean and Replace the Cover
Wipe both sides of the metal cover. If it is very greasy (common in kitchens), use a little bit of dish soap in your water. Dry it completely with a towel. Snap or screw the cover back into place. Ensure it sits level against the wall so the air can circulate properly.
A Real World Example: The “First Frost” Lesson
Imagine a homeowner named James. Every November, James turned on his heat and his smoke alarm would chirp for a few seconds because of the dust. He thought this was just “part of having an old house.”
Last year, his electricity bill jumped by 30 percent in one month. he finally took the covers off his heaters and found they were stuffed with golden retriever fur from his dog. After a 20-minute cleaning session, the smell disappeared, the house felt warmer, and his next bill was significantly lower. James realized that a little bit of maintenance saved his hundreds of dollars.
Common Mistakes to Avoid
We all make mistakes, but when it comes to heaters, some errors can be costly.
-
Using a Hairdryer: Some people try to blow the dust out. This just sends allergens flying all over your living room and onto your furniture. Always suck the dust out with a vacuum.
-
Forgetting the Breaker: Turning the thermostat to “low” is not the same as turning the power off. Always use the breaker box.
-
Bending the Fins: If you are too rough, you will “crush” the aluminum plates. If this happens, you can use a “fin comb” or a flathead screwdriver to very gently straighten them back out.
-
Using Sprays: Never spray cleaning chemicals or air fresheners directly onto the heating elements. They can create toxic fumes or catch fire when the unit gets hot.
Expert Tips for the Best Results
-
Check the Floor: Make sure your carpet or rugs are at least 1 inch away from the bottom of the heater. If the heater is “choked” at the bottom, it cannot pull in cold air to warm it up.
-
The Seasonal Schedule: Clean your heaters twice a year. Once in the autumn before you turn them on, and once in the spring when you turn them off.
-
Vacuum the Room First: If your floors are dusty, the heater will act like a vacuum and suck that dust right back into the fins the moment you turn it on.
-
Use Compressed Air Carefully: If your vacuum is weak, you can use a can of compressed air, but hold a damp towel on the other side of the heater to catch the dust as it flies out.
How This Fits Into Your Home Maintenance Strategy
Cleaning the surface is a great start, but there is more to learn about keeping your system running perfectly for years. For a deeper look at different types of units and advanced troubleshooting, you should read our complete guide in which we talked about how to clean Baseboard Heaters. Understanding the full strategy helps you spot problems before they become expensive repairs.
When to Call a Professional
Most cleaning is a “do it yourself” job. However, if you see the following things, you might need an electrician:
-
Frayed or burnt wires inside the unit.
-
A loud humming or buzzing sound that does not go away.
-
The heater does not get warm even after the power is on.
-
Black soot marks appearing on the wall above the heater (this can mean an electrical fault).
Conclusion
Taking the time to learn how to clean electric baseboard heaters is a gift to yourself. You will enjoy a fresher-smelling home, a safer environment, and lower energy costs. It only takes a vacuum and a few minutes of your time to make a massive difference. Don’t wait for the first cold snap to find out your heaters are clogged. Grab your vacuum today and give your heating system the breath of fresh air it deserves.
FAQ Section
1. How often should I clean my baseboard heaters?
You should clean them at least twice a year. If you have pets that shed a lot, you might want to do a quick vacuuming once a month during the winter.
2. Is it safe to use water to clean the heater?
You can use a damp cloth on the metal covers and the back frame. Never get the electrical wires wet and never pour water into the unit.
3. Why does my heater smell like it is burning?
This is usually just dust or hair burning off the heating element. Cleaning the unit will stop the smell. If the smell is like melting plastic, turn it off immediately and call a pro.
4. Can I paint my baseboard heater covers?
Yes, but you must use high-heat spray paint. Regular paint will peel, crack, or even give off fumes when the heater gets hot.
5. Do I have to take the cover off?
While you can vacuum through the slats, removing the cover is the only way to get a truly deep clean and remove all the fire hazards.