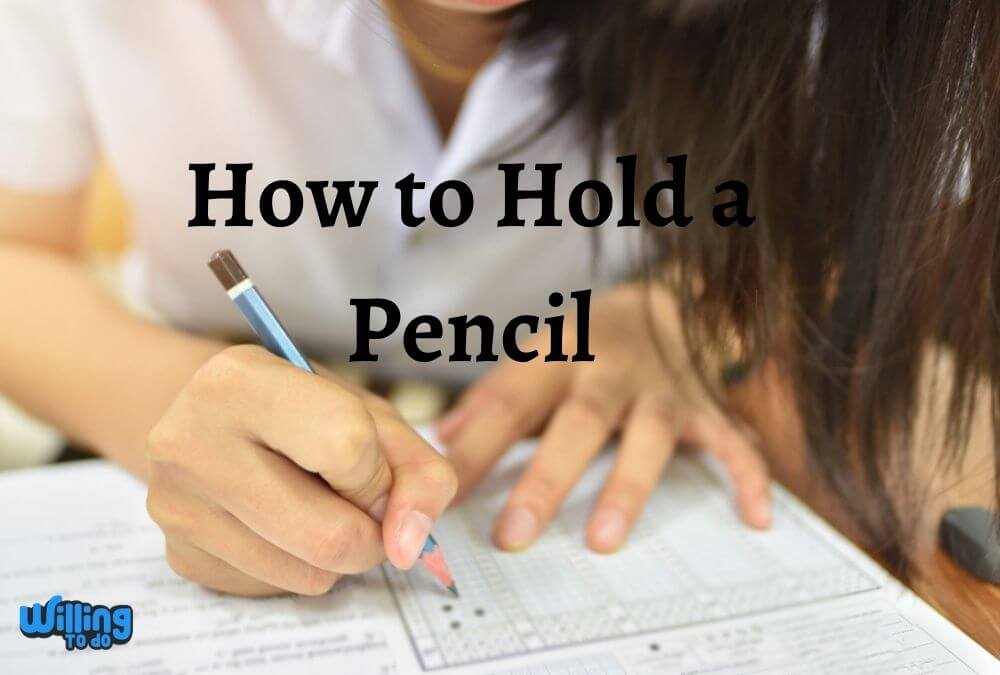
The pencil is one of the most precious tools we have at our disposal. From sketching a masterpiece to writing a heartfelt letter, it is a bridge between our thoughts and the physical world.
However, many people find that their pencils feel worthless or frustrating simply because they have not mastered how to hold a pencil accurately.
Following different methods to maintain good form ensures that your writing remains legible and your hand stays comfortable throughout the day.
Holding the pencil perfectly is the crucial first step in seeking knowledge about how to write and draw properly. Whether you are a student taking fast notes or an artist working on fine details, your grip dictates your success.
Research shows that using a synthetic or forced way to hold a pencil is one of the worst things you can do for your manual dexterity. A poor grip only stresses out your mind and disturbs the natural flow of your work.
By exploring the best methods for how to hold a pencil, you can improve your natural style and discover a more efficient way to create.
The basic method that we use for daily tasks is almost the same across various cultures, but it can be customized. You can set it according to your own comfort by putting your hand on the paper, which gives you more control and writing options.
Beyond the basics, you can try specialized techniques like the overhand and underhand methods, which are specifically designed for professional writing and artistic sketching.
How to Hold a Pencil for Maximum Control
A more solid grip of your pencil will actually guide you to a stabler control of writing and drawing. Once you attain higher confidence and command over any given design tool, the courage to explore what can be made with it becomes more attainable.
When we look at the mechanics of how to hold a pencil, we are really looking for a balance of tension and relaxation.
If you grip the wood too tightly, your muscles will fatigue within minutes. If the grip is too loose, you lose the ability to guide the lead exactly where it needs to go.
The goal is to let the pencil rest comfortably against your fingers so it feels like a natural extension of your body. This is a skill that requires patience, especially if you have spent years using a “fisted” or “hooked” grip.
However, the benefits of transitioning to a professional grip are immediate. You will notice cleaner lines, faster writing speeds, and a significant reduction in wrist pain.
It is much like learning how to roller skate for the first time; it feels strange initially, but once you find your balance, everything becomes much smoother.
The Importance of Ergonomics in Writing
Ergonomics is the study of how people interact with their tools. In the context of writing, it means finding a way to work that does not cause physical harm. Many people suffer from “writer’s cramp” because they are fighting against the natural anatomy of their hands.
By learning how to hold a pencil correctly, you allow the larger muscles in your arm to support the fine motor movements of your fingers. This prevents the small joints in your hand from taking the brunt of the pressure.
The Tripod Method: The Classic Approach
The most popular way of holding a pencil is the tripod method. In the tripod method, the thumb and the forefinger are in the form of a triangle, with the middle finger being helped with the ring finger and pinkie.
This three point contact provides incredible stability while allowing for a wide range of motion.
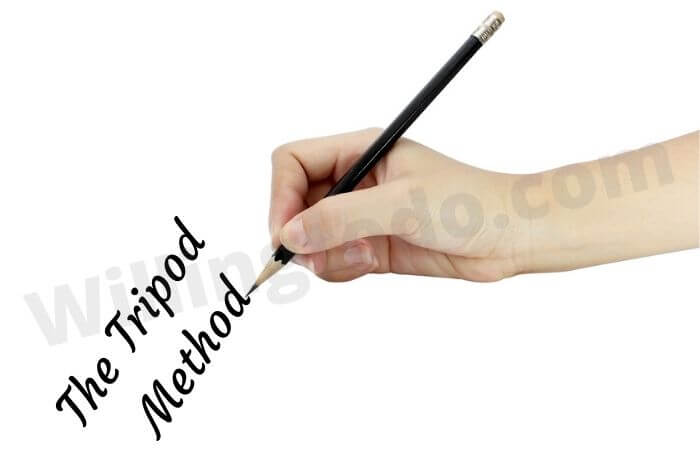
This method allows you to hold the pencil tightly without excessive force. It is considered the ideal method for drawing and sketching, especially when perfection is crucial.
When you use the tripod grip, you can easily pivot the pencil to reach different angles without having to lift your hand off the page.
The pencil’s upright pattern allows you to use the tip rather than the sides, which is essential for precise lines and text.
We use the fingers and thumb to manage the pencil movements in the tripod method. During the work, your hand may rest on the remaining sheet. To prevent smudges, use a rough sheet of paper to keep your working sheet clean.
This simple habit, combined with a proper grip, ensures that your final product looks professional and polished.
If you find yourself losing focus during long writing sessions, you might explore how to make time go faster by switching between different writing tasks to keep your mind engaged.
The Extended Tripod Method for Greater Reach
The extended tripod method is another helpful technique to determine how to hold a pencil. The holding style is similar to the basic tripod method, featuring a triangle made by the fingers and the thumb, but you hold the pencil further up the shaft.
This small change makes a big difference in how the pencil behaves on the paper.
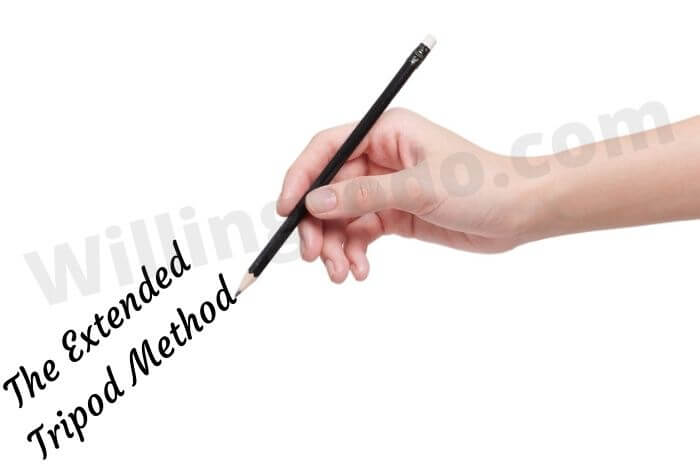
Enjoy the freedom that the extended method provides. It is as simple as the most famous basic method, but it offers a lighter touch. You may feel more comfortable and relaxed while using this method for light sketching or when you need to cover a large area of the paper quickly.
In the extended tripod method, holding the pencil further back allows your pinkie to move more freely, which facilitates higher pencil tip movements.
It also keeps your hand further away from the lead, which decreases the risks of smudging your sheet. For the most reliable results, maintain a comfortable hold on the pencil.
This technique is often used by architects and designers who need to draw long, straight lines without the restriction of a tight grip.
If you are a freelancer working on professional designs, mastering this grip can be as beneficial as knowing how to get a first job on Upwork by showcasing your technical skills.
The Overhand Method for Creative Shading
The overhand holding method is a famous style to hold a pencil for drawing and painting. It enables you to shade with the side tip of the pencil, creating broad strokes and soft textures that are impossible with a standard writing grip.
This is a favorite among fine artists who work with graphite or charcoal.
For vertical sketching sheets like an easel, it’s the best pencil holding technique. In the overhand pencil holding technique, you hold the pencil softly between your fingers and the flat of your thumb. The pencil stays parallel to the paper rather than perpendicular.
The exact position will change according to your sitting plan and hand dimensions. The main purpose is to have a firm but comfortable control over the pencil without digging into the paper.
For better results, allow your arm full movement and freely expressive mark-making. By moving your shoulder and elbow instead of just your wrist, you can create massive, sweeping lines that have a lot of character.
No doubt it’s the best way to know how to hold a pencil for artistic expression, but it does not mean it is less effective for specialized writing tasks either.
If you are pursuing a career in the arts, you might also be interested in how to become a businessman to sell your creations effectively.
The Underhand Method for Loose Gestures
The underhand pencil holding method is very relaxed and loose. It is beneficial for random, broad drawing and is a very excellent way to sketch with charcoal.
This grip is perfect for “blocking in” shapes during the early stages of a drawing or when you want your writing to have a more casual, flowing feel.
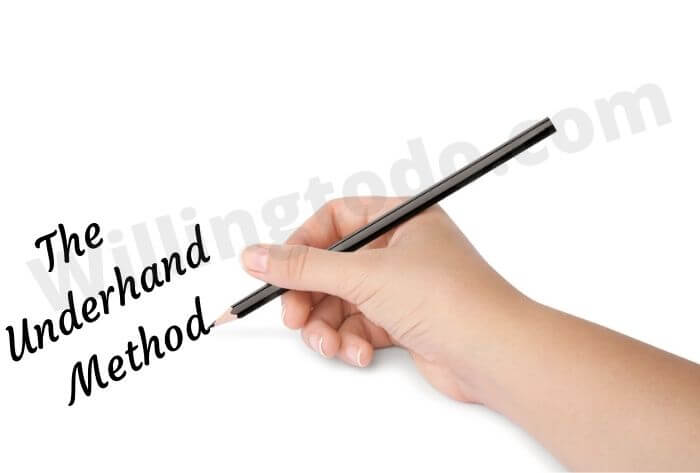
It is primarily a tipped over tripod method. To learn how to hold a pencil this way, you can adjust the angle according to your comfort. For example, some people move their thumb higher up on the pencil to gain a different type of leverage.
Artists often allow the pencil to rest in the “V” of the palm and the thumb, with the middle and index finger softly controlling the tip.
This method is excellent for maintaining a light touch, which is crucial when you don’t want to leave permanent marks on the paper. It is also a great way to help children explore the paper without the pressure of perfect letter formation.
If you are teaching a child at home, you can find more tips on how to support child learning at home to make their educational journey more enjoyable.
Practical Strategies to Improve Your Form
Transitioning to a new grip takes time. If you have been holding your pencil the “wrong” way for decades, your muscles have developed a memory that will be hard to overwrite. However, you can use a few tricks to speed up the process.
First, try using a pencil grip attachment. These inexpensive rubber tools force your fingers into the tripod position. Second, practice with different types of pencils. Sometimes a thicker barrel is easier to hold than a standard thin yellow pencil.
Another helpful tip is to practice “air writing.” Move your hand in the tripod position through the air without touching the paper. This helps your brain understand the motion without the resistance of the lead.
Eventually, the correct way of how to hold a pencil will become second nature. This improvement in fine motor skills can even help with other tasks, such as how to restring a guitar or performing delicate DIY projects like how to make lip gloss.
Choosing the Right Pencil for Your Hand
Not all pencils are created equal. The weight and texture of the pencil can affect how you hold it. A very smooth, painted pencil might slip, causing you to grip it tighter.
A natural wood finish provides more friction, allowing for a more relaxed hold. Experiment with various weights to see what feels best in your hand. This attention to detail is what separates a beginner from a professional.
The Role of Physical Health in Penmanship
It is important to remember that your hand does not work in isolation. Your posture, the height of your desk, and even the way you sit can affect how to hold a pencil. If you are hunched over, your wrist has to bend at an awkward angle.
If your desk is too high, your shoulder will become tense. Ensure that your workspace is set up to support your body. A good ergonomic setup is just as vital as the grip itself.
If you are looking for ways to improve your overall well-being, you can check out a complete guide to building a healthy daily routine.
Conclusion
Learning how to hold a pencil is a simple yet powerful skill that serves as a foundation for effective communication and artistic expression. It is a handwriting tool for assisting you to get the accurate finger point for maximum efficiency.
For parents, teaching your children how to hold a pencil exactly is essential so they can handle the tool quickly and use the right amount of pressure. Overall, it makes writing more comfortable and prevents long term physical strain.
By exploring the tripod, extended tripod, overhand, and underhand methods, you can find the style that works best for your specific needs.
Whether you are writing a professional report or sketching in a park, the right grip will give you the confidence to succeed. Keep practicing, stay patient with yourself, and remember that even the most expert writers had to start with the basics.
Frequently Asked Questions
Why does my hand hurt when I write for a long time?
Hand pain is usually caused by a grip that is too tight or a posture that puts too much strain on the wrist. By learning a more ergonomic way of how to hold a pencil, such as the tripod method, you can significantly reduce this discomfort.
At what age should a child learn to hold a pencil correctly?
Most children begin to develop a functional tripod grip between the ages of 4 and 6. It is helpful to provide them with thick crayons or triangular pencils early on to encourage proper finger placement naturally.
Can I use the overhand grip for regular writing?
While the overhand grip is excellent for shading and artistic work, it is not recommended for standard writing. It lacks the precision needed for small letter formation and can be difficult to maintain on a flat horizontal surface.
Is there a specific way for left handed people to hold a pencil?
Left handed individuals can use the same tripod method, but they often find it helpful to hold the pencil slightly higher up the shaft. This allows them to see what they have just written and prevents their hand from smudging the lead as it moves across the page.
Do pencil grips actually work?
Yes, pencil grips are very effective for both children and adults. they provide a physical cue that guides the fingers into the correct position, making it much easier to build muscle memory for a proper tripod grip.
What is the best way to hold a pencil for shading?
The overhand method is generally the best for shading because it utilizes the side of the pencil lead. This allows for softer, broader strokes that are much easier to blend than the sharp lines produced by the tip of the pencil.